How to Tune a Polaris Carburetor: A Step‑by‑Step Guide
Why Carburetor Tuning Matters
When you’re out on the trails, every ounce of power counts. A well‑adjusted carburetor can mean smoother acceleration, better fuel economy, and less strain on the engine. Over time, dust, altitude changes, or simply wear can push the air‑fuel mixture out of its sweet spot, leaving your Polaris feeling sluggish or overly aggressive. That's why tuning your Polaris carburetor isn’t just a maintenance task—it’s a way to keep the machine performing at its best.
Tools and Preparations
- Flathead screwdriver (often #2 or #3)
- Phillips screwdriver
- Small socket set (usually 5 mm and 6 mm)
- Digital or analog tachometer (optional but helpful)
- Fresh fuel (clean, ethanol‑free if possible)
- Safety glasses and gloves
Before you start, let the engine run until it reaches normal operating temperature. Warm metal expands slightly, giving you a more accurate baseline for adjustments. Also, make sure the ATV is on a level surface and the spark plug is removed to prevent accidental starts.
Step 1: Locate the Adjustment Screws
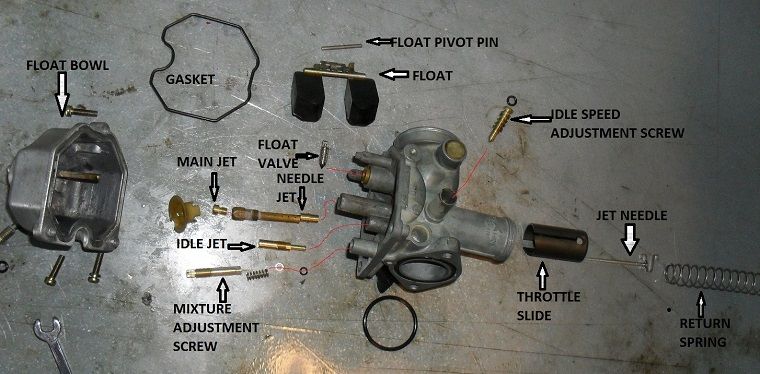
The Polaris carburetor typically features two main screws: the low‑speed (idle) screw and the high‑speed (main) screw. The low‑speed screw sits on the side of the carburetor body and controls the mixture when the throttle is barely open. The high‑speed screw, often recessed, governs the mixture at full throttle. Refer to your model’s service manual for exact locations, but most 4‑stroke engines follow this layout.
Step 2: Set the Baseline
Turn both screws clockwise until they lightly seat—do not force them. Then back them out three turns each. This standard starting point works for most Polaris models and gives you a neutral baseline from which to fine‑tune.
Step 3: Adjust the Low‑Speed Screw
With the engine idling, slowly turn the low‑speed screw clockwise. You’ll notice the RPM rise, then drop as you pass the optimal mixture point. The goal is a steady idle around 1,200–1,400 RPM for most 4‑stroke engines. If the engine stalls, you’ve turned it too rich; back it out just enough to keep the idle smooth.
Step 4: Tweak the High‑Speed Screw
Now engage the throttle fully. Watch the RPM or, if you have a tachometer, note the peak reading. Turn the high‑speed screw clockwise in small ¼‑turn increments. If the engine feels “bogged down” or the exhaust notes become harsh, you’ve leaned it too much—back the screw out slightly. The sweet spot is usually a few turns richer than the peak RPM, giving the engine a little extra fuel for power without sacrificing efficiency.
Step 5: Check for Flat Spots and Hesitation
Take the ATV for a short ride, focusing on acceleration from a stop and mid‑range throttle response. If you notice a flat spot—where the engine hesitates before pulling forward—return to the low‑speed screw and enrich the mixture just a touch. Conversely, if the engine revs too high without gaining speed, lean the mixture a bit.
Step 6: Re‑Verify Idle and Shut Down
After road testing, let the engine idle again and confirm the RPM remains within the target range. Tighten any loose bolts you may have disturbed, replace the spark plug, and give the carburetor a final visual inspection for fuel leaks.
Troubleshooting Common Issues
Engine stalls at idle: Usually a sign of a mixture that’s too lean. Slightly back out the low‑speed screw.
Excessive smoke from the exhaust: Indicates a rich mixture. Back off the high‑speed screw a quarter turn and re‑test.
Rough running after a rainstorm: Moisture can affect the jetting. Dry the carburetor, then repeat the baseline adjustment steps.
When to Seek Professional Help
If you’ve walked through all the steps and the engine still runs poorly, the problem may lie deeper—perhaps a clogged jet, a warped throttle valve, or internal engine wear. In those cases, a qualified mechanic can disassemble the carburetor for a thorough cleaning or replace worn components.
Quick Reference Checklist
- Warm engine before adjusting.
- Set both screws to 3 turns out after seating.
- Low‑speed screw: target 1,200–1,400 RPM idle.
- High‑speed screw: enrich slightly beyond peak RPM.
- Test on the trail; adjust for flat spots.
- Re‑check idle and tighten all fittings.
FAQ
Q: How often should I tune the carburetor on my Polaris?
A: Generally, a tune‑up every 50–75 hours of riding or after major altitude changes helps maintain optimal performance.
Q: Can I use gasoline with up to 10% ethanol?
A: Yes, but higher ethanol blends can affect the carburetor’s seals over time. If you run ethanol‑rich fuel, consider cleaning the carburetor more frequently.
Q: My ATV sputters when I shift gears—does that relate to carburetor tuning?
A: Often, yes. A slightly richer low‑speed setting can smooth out gear‑shift transitions, especially on older models.